Who doesn’t love long, lush lashes? Whether you’re heading out for a special occasion or just trying to enhance your natural beauty, achieving that perfect C curl lash look doesn’t have to be a hassle. With the right technique and the key products, you can master those curls in no time.
Too often we think achieving beautiful lashes is complicated and expensive. But the truth is that with a few simple steps, you can get the glamorous look of C curl lashes at home.
We’ll show you how—from start to finish—in just a few easy steps. So grab your curler and your favorite mascara and let’s get started!
What Are C Curl Lashes?
C curl lashes are the latest must-have look for big, beautiful eyes. If you’re looking for dramatic, longer-lasting lashes, C curl is the way to go. Unlike traditional false eyelashes, which can be short and straight, C curl lashes give your eyes a bigger, bolder look. They provide an instant boost of volume and length that can be customized depending on your desired style.
C curl lashes are also long-lasting and natural-looking. Unlike other lash extensions that tend to be stiff and heavy, C curl lashes are made of lightweight materials that provide just the right amount of support to your natural lashes without making them look overbearing or fake. Additionally, C curl lashes come in different lengths and shades so you can find the perfect style to complement your eye shape and face shape.
How to Choose the Right C Curl Lashes
When it comes to achieving perfectly curled lashes, the secret is choosing the right C curl lashes for your eye shape. The good news is that there are a lot of options available in the market, including synthetic and natural mink. It all comes down to finding the ones that best fit your eye makeup look.
For starters, you should look for C curl lashes with a natural-looking appearance. This way, it won’t seem like you’ve done anything differently when you apply them – just add a bit of definition and extra volume to your eyes!
When purchasing C curl lashes, keep in mind that there are also different lengths and thicknesses available. Depending on what kind of look you’re going for, you can choose from long and thick lashes or short and thin ones. If you want a more dramatic effect, then opt for longer ones; however, if you’re after something more subtle then go for the shorter ones. The choice is up to you!
Preparing Your Eyes for C Curl Lashes
Now you’re ready to prep your eyes for that perfect C Curl Lash look! Make sure everything is clean, sanitized, and ready to go.
Remove makeup
If you wear eye makeup, it’s important to remove it before applying lashes, so you don’t risk irritating your eyes. Use an oil-based makeup remover like our [Brand] Oil-Based Makeup Remover on a soft cloth and gently dab away your eye makeup.
Cleanse and moisturize
Once the makeup is removed, use a gentle cleanser (like our [Brand] Cucumber Cleanser) and warm water to rinse the area around your eyes. Then, pat dry with a soft towel and apply our [Brand] Eye Moisturizer before applying lashes. This will help keep them looking great for longer!
Apply Lash Adhesive
Before curling your lashes, apply the adhesive strip from our [Brand] C Curl Lash kit above the lash line. It should take just a few seconds to get a thin layer of adhesive on each eye. Wait about 30 seconds for it to become tacky before applying your lashes. Now you’re ready for step three!
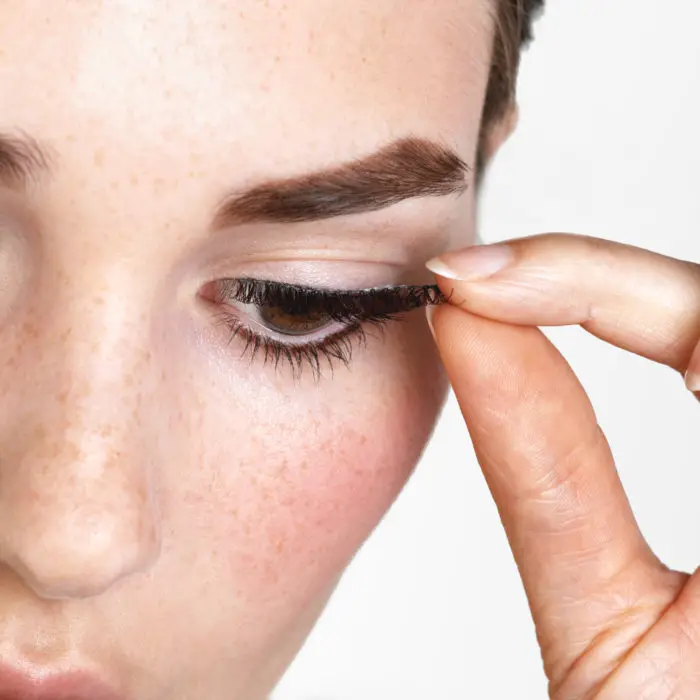
Applying for C Curl Lash Extensions
Ready to apply for those C curl lash extensions? Great, let’s get started.
Step 1: Preparing the Lash Extensions
First things first, you’ll need to prep your lash extensions. This is where you determine the size and shape of the lashes that you’ll be using. It also helps to have a plan in mind, so you know what type of pattern you want to create on your client’s lash line.
Once everything is prepped, pick up an extension with tweezers and place it on the natural lash that matches in length and thickness. Then isolate each individual lash.
Step 2: Applying Adhesive & Glue Dots
Once the lashes are ready for application, it’s time for adhesive! Apply a thin line of adhesive and use a glue dot to secure the extension onto the natural lash. You don’t want too much glue because it can damage your client’s lashes—so use as little as possible.
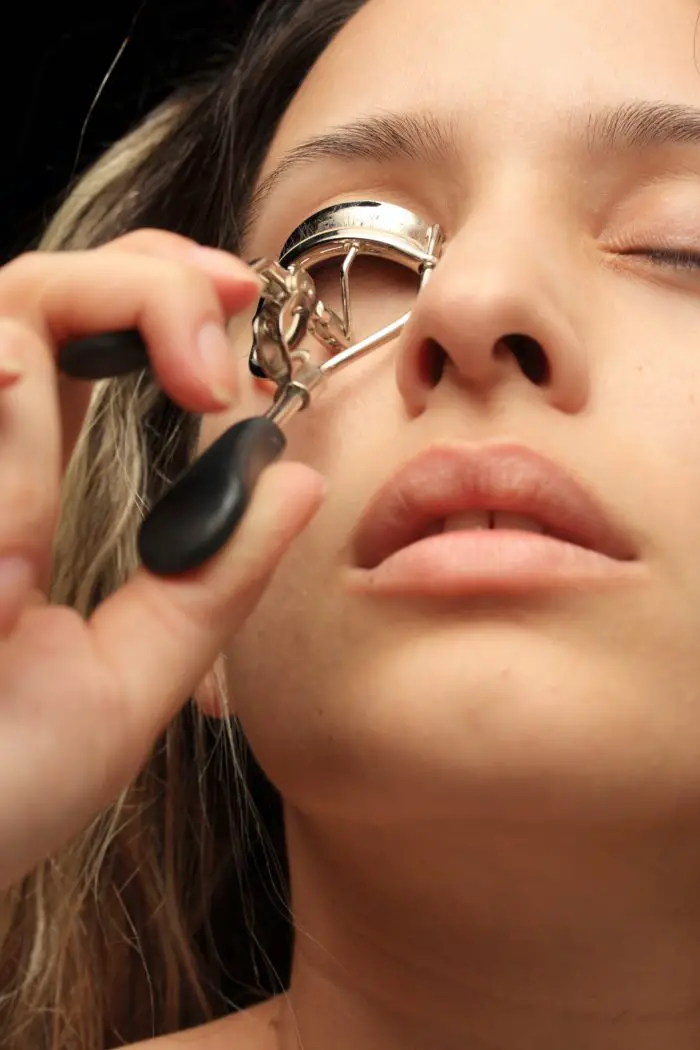
Step 3: Curling Your Lashes
The final step is curling your lashes with a special curling tool meant for eyelash extensions. Gently press down on the base of each individual extension for about ten seconds before releasing it—this will give them that perfect C curl look!
Special Considerations for Long-Term Care
Taking care of your C Curl Lashes doesn’t just include applying or removing them, but regular maintenance to keep them looking their best. Here are some tips to make sure that your lashes will stay looking gorgeous!
Avoid oil-based products
Oil-based products can break down the adhesive so avoid any lash care product that has a lot of oil in it. Instead, look for something specifically made for eyelash extensions like a gentle cleanser or mascara specially formulated for lash extensions.
Clean your lashes carefully
Gently brush your lashes when you wake up and at night before bed but be sure not to tug them too hard—they can still come off even with gentle care! It’s also important not to get your lashes wet for 24 hours after an application as the adhesive needs time to set.
Visit your beautician regularly
Make sure you’re visiting your beautician regularly for touch-ups, which usually range from two weeks to one month apart depending on how well you take care of your lashes in between appointments. Doing so will ensure that you have a full set of beautiful, natural-looking curls.
Benefits Of Using C Curl Lashes For Different Eye Shapes
C curl lashes can provide several benefits for different eye shapes and help enhance the natural beauty in various ways. Here are some benefits of using C curl lashes based on different eye shapes:
- Round eyes: C curl lashes can help elongate the eyes and create a more almond shape, making them look more proportionate and attractive.
- Hooded eyes: C curl lashes can lift the eyelid and create the illusion of a larger eye, making the eyes appear more open and awake.
- Monolid eyes: C curl lashes can add dimension to the eye by creating a subtle lift at the outer corner, which can make the eyes appear more almond-shaped and attractive.
- Almond eyes: C curl lashes can add volume and length to the outer corner of the eye, creating a dramatic, cat-eye effect that enhances the natural beauty of the eye shape.
In general, C curl lashes are a great choice for those looking to achieve a natural yet enhanced look. They provide a subtle lift to the lashes without looking overly dramatic, making them perfect for everyday wear. Additionally, C curl lashes can help add dimension to the eyes and create a more youthful appearance, making them an excellent choice for those looking to enhance their natural beauty. Overall, C curl lashes are a versatile option that can flatter many different eye shapes and enhance a person’s natural features.
Tips and Tricks for Perfect C Curl Lashes
If you want to get a perfect C Curl with your lashes, here are some tips and tricks that can help ensure that your lashes look their best:
- Use a good quality lash adhesive designed for long-lasting lashes. You want a glue that’s going to keep those curls in place through all your activities!
- Don’t skimp on the application time — be sure to give your lash adhesive enough time to set before you apply the lashes so they don’t slide off.
- Choose natural-looking lashes with an even curl — this will make it easier to blend the lashes and achieve a subtle, beautiful look.
- Take your time when you’re applying them, and use tweezers if needed to get just the right placement of each individual lash.
- After you’re done applying them, take a few minutes to adjust and style the lashes, ensuring they look how you want them before setting them with mascara or finishing spray.
By following these simple steps, you can create perfect C Curl Lashes for any occasion!
Conclusion
Getting the perfect C curl lashes has never been easier. With just three easy steps, you can achieve beautiful, full lashes that add drama, glamor, and sophistication to your look. The best part? You don’t have to break the bank to get salon-worthy lashes in the comfort of your own home.
C curl lashes are the perfect way to add volume and length to your lashes without compromising comfort or quality. Plus, with just a few minutes of your time each morning, you can create a stunning, eye-catching look that will last throughout the day. So, why wait? Give your lashes the TLC they deserve and get the look: perfect C curl lashes in three easy steps.